Showing posts with label Recipes. Show all posts

Saturday, July 19, 2014

Gruyere O'Gratin Taters...Hint, it's all about the NUTMEG

Alright, so I was super duper healthy with that Quinoa Tabouleh salad, but I also boarded the decadent train with another dish today.  Luckily, multiple mouths helped consume all the yumminess so calorie intake is in tact (until I hit up the leftovers later...HA!) Anyway, as I mentioned in my last post, I took a wonderful cooking class at Cook L.A. (Visit the website here!) and learned killer new dishes, as well as valuable knife, roasting, blanching, and toasting skills!  One of the dishes I learned was Gruyere O'Gratin Potatoes.  For the love of all that is holy....TRUST me when I say this one is a winner.

Here's What You'll Need:

3 Pounds of Potatoes - peeled and thinly sliced (Russet or Idaho work best)
3 Cloves of Garlic - finely minced
Kosher Salt, Black Pepper & Nutmeg - to taste
3/4 Pound Gruyere Cheese - grated (add a second type of cheese for a little variety)
2 Cups Heavy Cream


1.  Peel the potatoes and cut them into thin and even slices.  Making sure they are sliced evenly ensures an evenly baked dish!  Grate the cheese.


2.  Butter a pyrex dish (Either use one 9x13 or two 8x8 dishes).

3.  Place a layer of potatoes on the bottom of the dish.  Then sprinkle a handful of gruyere and minced garlic, and season with salt, pepper, and a dusting of nutmeg.  You want the nutmeg to be subtle.


4.  Repeat this process until you run out of potatoes and cheese.  Then pour the heavy cream evenly over the potatoes. 


5.  Bake uncovered at 350 degrees until done, approximately 50-60 minutes.  Check potatoes with a fork.  Fork should slide into potato easily.  If cheese is getting too brown, but potatoes are not yet done, cover with foil and continue baking.

6.  Remove from oven and allow potatoes to set (15 minutes or so!)  Serve and call me from heaven cuz after one bite of these bad boys, you'll think you've died and gone there!  ENJOY!


Quinoa Tabouleh Will Make you Drooly!

Boy, did I get busy in the kitchen today!  I was chopping and dicing like it was my job!  I love an afternoon of kitchen fun!  Forever on a quest for high protein, healthy vegetarian dishes, I was SUPER excited to learn this recipe last week.  I took a cooking class at a wonderful little cooking school in Studio City, CA called Cook L.A.  (Click Here to Learn More about Cook LA)  On this particular night, it just so happened that all menu items were vegetarian!  Bonus!  I loved all of the dishes we made that evening, but the Quinoa Tabouleh stood out as a wonderfully fresh summer dish that I would love to share with all of you.  That being said, full credit to Liz at Cook L.A. for the original recipe.  I tweaked it just a bit to my liking, as I'm sure we all do when it comes to loosely following a recipe.  (Except baking, I RARELY tweak a recipe when baking!)  Anyway, on to the goodness...

Here's What You Will Need:

1 Cup Quinoa (I used the Simple Truth organic brand from Ralph's)
2 Cups Water (or to punch up the flavor I used Simple Truth organic vegetable broth)
1 Bunch Parsley - chopped
3 Green Onions - sliced into thin scallions
3 Medium Tomatoes - small dice
5 Small Persian Cucumbers - sliced length wise and then chopped into 1/4" half moons (see photo below)
1/2 Medium Red Onion - medium dice
3 Cloves of Garlic - finely minced
Olive Oil (approx. 1/4 cup, but I just toss it on to taste)
Salt and Pepper to taste
Juice of a Medium Lemon (watch those seeds)


**Get creative and add a bit of mint, perhaps some diced watermelon, diced red and yellow bell peppers, or even some feta cheese!  However, the recipe above is bursting with flavor as is!**

1.  Step one is IMPORTANT!!  Dry toast the quinoa in a sauce pan before adding any liquid.  Stirring constantly, the quinoa will brown up a bit and smell almost like nutty popcorn!  Do this for 4 to 5 minutes.

2.  Add your water or vegetable broth to the quinoa and bring to a boil.  After it's boiling, reduce to a simmer.  Leave it uncovered and simmering until all liquid is gone.  Set aside to cool.


3.  In a large bowl toss together your parsley, scallions, tomatoes, cucumbers, red onion, garlic, olive oil, salt and pepper, and lemon juice. (and anything else you've decided to add)

  
Here are your half moon cucumbers!
Look at that color palette!!


4.  Add your room temperature quinoa and mix together!  SERVE!!!  

This is a beautiful dish, bursting with flavor!  And it's quite lovely, aesthetically speaking!  


Monday, July 22, 2013

Italian Zucchini Boats...

Based on the name...perhaps I should call these gondolas??  

I haven't shared a recipe in a while...probably because I haven't been doing much cooking!  Cooking is my love, my escape, my zen place!  Well, one of them!  Anyway, I'm back from New Orleans and Spain and boy do I have the cooking bug.  This recipe was oh so simple, but really delicious!  It's also something that you can definitely modify and make it your own!  This is a vegetarian recipe, but again, meat can always be added for the carnivores out there!!  :)

What You Will Need (to feed 5-6):

1.  6 - 7 hearty sized zucchinis
2.  4 cloves of fresh garlic, finely minced (garlic powder or paste can be substituted, but c'mon...let's keep it real!)
3.  1 can of quartered artichoke hearts, coarsely chopped
4.  2 cans of crushed tomatoes, preferably the ones that already have oregano or garlic flavorings.  (Or if you want to keep it UBER clean, toss some tomatoes and seasonings into your food processor to make your own crushed tomatoes!)  
5.  3 teaspoons of olive oil
6.  Salt and Pepper to taste
7.  1 cup of Italian seasoned bread crumbs.  I used the panko type for better crunch.
8.  1 cup of shredded mozzarella cheese

Steps:

1.  Pre-heat your oven to 350.
2.  Line a large baking tray with foil and spray the foil with non-stick spray (optional).
3.  Slice your zucchinis length wise in half (do this as evenly as possible).
4.  Using a spoon, scoop out the pulp of your zucchini halves into a bowl and place zucchini halves on your baking tray.

Your empty zucchini halves will look like this..


5.  In a large, non-stick pan, heat up your olive oil and minced garlic.  
6.  Add the zucchini pulp, chopped artichoke hearts, crushed tomatoes, salt and pepper.  Let simmer for about 15 minutes until some of the juice has evaporated.  This is where you can get creative!  Add onion, oregano, thyme, corn, bacon bits, sausage, shredded carrots...WHATEVER YOUR HEART DESIRES!


7.  Next, ladle the hot filling into zucchini boats! Fill 'em up, don't be shy!


8.  Place filled zucchini boats in the oven for 20 minutes.
9.  After 20 minutes, remove zucchini boats from oven.  Sprinkle shredded mozzarella cheese and bread crumbs all over boats.  
10.  Bake 10-12 more minutes.  Zucchini boats should be tender, but not mushy!  Bread crumbs and cheese should appear toasty!  Mmmmm!
11.  Serve this with a spinach salad to keep it green and low carb!  ENJOY and don't forget the vino!!!


Tuesday, February 19, 2013

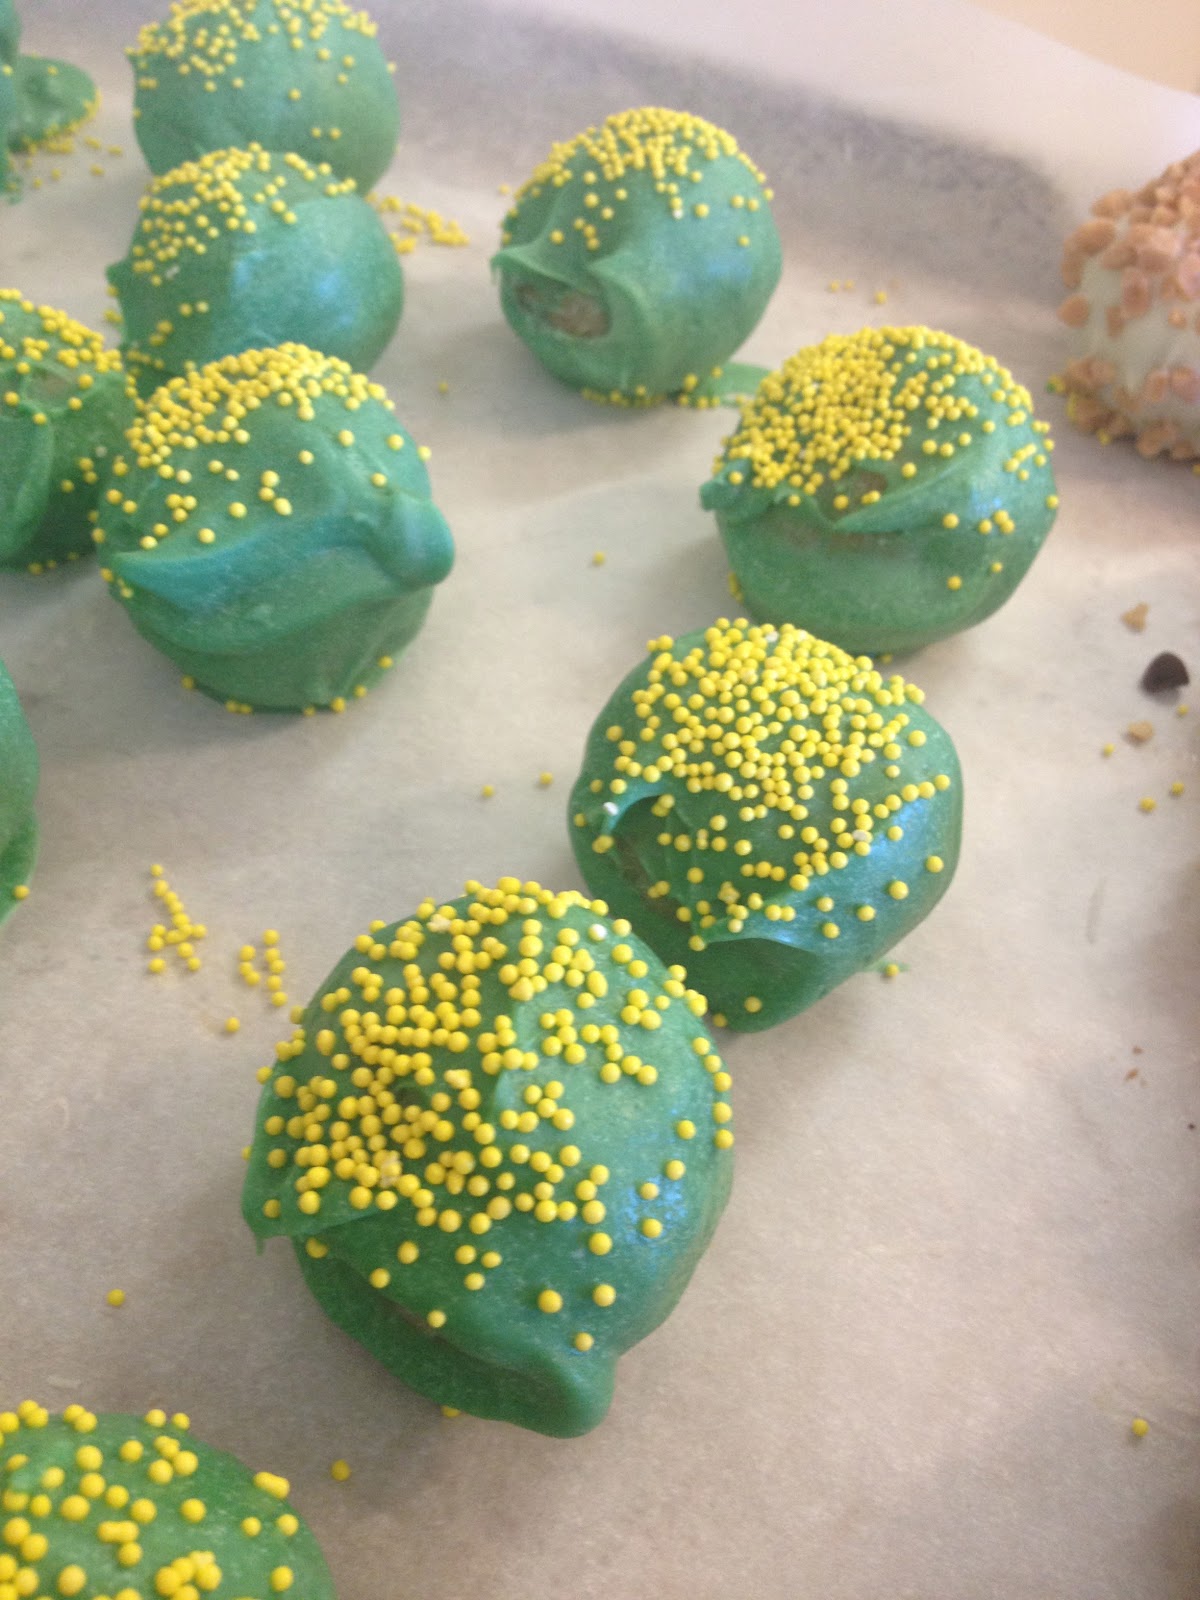
Cake Ball Fun!

As much as I love to cook, I'm really not much of a baker.  Baking is truly an art form, as well as a science.  If I were in charge of a four course meal, I would make everything from scratch and then suggest we go out for fro yo at the end of the dinner party.  :)  However, over the summer I learned an easy to make, yet decadent dessert that I'd like to share with my lovely readers.  Not only is this recipe simple, but it's extremely versatile, is quite popular right now, makes for a gorgeous presentation and can be tailored to fit any theme or party!  Introducing...

CAKE BALLS!!!

What you will need:
*1 box of cake mix and all of the ingredients needed to bake the cake.  You can choose any flavor of cake.  I've used yellow cake, chocolate cake, lemon cake and even strawberry cake.
*1 tub of white frosting (you can use chocolate, but only for dark cakes)
*1 bag of candy melts in your color of choice

*Toppings of choice (sprinkles, chopped nuts, butterscotch chips, chocolate chips, crushed peppermint, etc)

Directions:
1.  Bake your cake in a 9x13 pyrex according to instructions and let cool.
2.  Slice your cake into four sections, slicing in a criss cross direction.  Pull out two sections at a time, and over a large bowl, gently rub the sections of cake together and it will start to crumble into the bowl.  Crumbs should be small.  Do this until completely crumbled.  Do this to the remaining two sections of cake.  You will have a large sized mound of crumbled cake in your bowl.

3. Now spoon about 1/4 cup of the white frosting into your cake crumbles and using your finger tips, combine the crumbles and frosting.  You may need to add more frosting.  Consistency should be moist and you should be able to shape the cake into relatively sturdy balls.
4.  Line a large cookie tray with wax or parchment paper and as you shape the cake balls, place them on the wax paper.  Once your tray is filled, place in refrigerator to chill.  The chill will help them hold their shape.  Chill for about an hour.
5.  After about an hour, create a double boiler on your stove and melt your candy coating.  


6.  This is where you can get creative in terms of color!  With my lemonade cake (which I think of as a Spring or Summer flavor) I used a beautiful green coating with yellow sprinkles.  If you were making these treats for Halloween, you could use orange candy coat and top your cake balls with crushed Oreos or mini chocolate chips.  The combinations of flavors and colors are endless!  
6.  When candy is thoroughly melted, place a chilled cake ball on a spoon, dip it into the candy melt, thoroughly coat, and place back on wax paper.  Apply toppings immediately before candy hardens.  Repeat until all cake balls have been coated and topped.  VOILA!  A gorgeous and delicious dessert!!


Credit to Julia Wilson for teaching me to make these gems! xo

Wednesday, January 30, 2013

Vegetarian Thai Peanut Pasta

As many of you know, there are few things that give me greater pleasure than cooking.  Nothing beats skipping around the kitchen, music blasting, and creating something new and tasty.  So today, in the spirit of my love for all things palate related, I would like share a delicious and easy recipe for Vegetarian Thai Peanut Pasta.  This is a recipe near and dear to my flavor loving heart.  I like it spicy, but you can certainly vary the ingredients to favor your taste buds. This can be prepared for a group of friends or for a party of one.  The recipe I am sharing serves five people.  You can double or halve if necessary.  Additionally, it can be tweaked to fit many diet restrictions.

What You Will Need:

1/3 cup chunky peanut butter (You can go with natural, reduced fat or full fat.  It is up to you!)
1/3 cup water
3 tbsp. brown sugar
3 tbsp. rice vinegar
3 tbsp. soy sauce (Use low sodium if you are going for the healthy!)
1 tsp. crushed red pepper (Reduce if you don't like it too spicy!)
8 ounces uncooked spaghetti (You can use white, wheat or gluten-free pasta!)
10 ounces fresh snow peas, trimmed 
1 large carrot, shredded


Directions:

Cook pasta according to directions.  Add snow peas to pasta the last 3 minutes of cooking. Drain and place cooked pasta in a large serving bowl.  While pasta is cooking,  combine the first six ingredients in a medium saucepan.  Cook over medium heat until mixture begins to boil, stirring the entire time.  Remove from heat and add sauce and carrots to pasta, tossing thoroughly to coat noodles.

I would serve this pasta dish with a light salad made of iceberg or romaine lettuce, mandarin orange slices, peeled cucumber, slivered almonds and a light sesame dressing!  Bon Appetit!!